
The world of electricity right at their fingertips!
Watch and learn with your child as they discover how electricity works through a series of fun and educational projects using our Circuit Scribe products. Coach your child through the project by using the provided tutorials instructions and soon they will be on their way to learning the basics of electricity!
What is Resistance?
Step One

Resistors
Simply put, a resistor restricts the flow of current through a circuit. Resistors are used to control the brightness of an LED, the volume of a buzzer, or the speed of a motor.
In this lesson, you'll need to use the packet of through-hole components that comes with your 2-pin module. Let's get started!
Step Two
Current flow
To understand resistors it's helpful to think of the wire as a highway. Just like cars travel along the highway, electricity travels through the wire. On highways we use speed limits or block off traffic lanes to maintain safety. In circuits, resistors control or limit the amount of current that runs through a wire.
In the graphic you can see what a resistor looks like in a circuit schematic. Below is a visual of our highway analogy. The road on the left has low resistance, and the road on the right has high resistance. Resistance is represented as orange traffic cones blocking off lanes. As more resistance is introduced, and the rate of traffic flow decreases.
The same concept is happening in the wire, but on a much, much smaller scale!

Step Three

Resistor Circuit
Voltage, measured in units of volts, is the energy that pushes current to flow through the circuit loop. It also determines which direction current flows in. Current flows from the battery’s positive (+) terminal towards the negative (-) terminal. (See the arrows in the circuit above.)
Use your kit to draw the circuit in the picture above. Pay attention to which way the 9V battery is facing: the + end will face up. Insert a resistor into the 2-pin module, as shown, and the LED will turn on.
Now what happens if you flip the battery around to point the other direction? Current flows the other way!
Tip: The LED will change direction too! We use our LED modules to visualize which direction current flows in.
Step Four
LED Brightness
Which direction does current flow in if the + side of the battery faces down?
clockwise
counter-clockwise

Step Five
Resistor Color Code
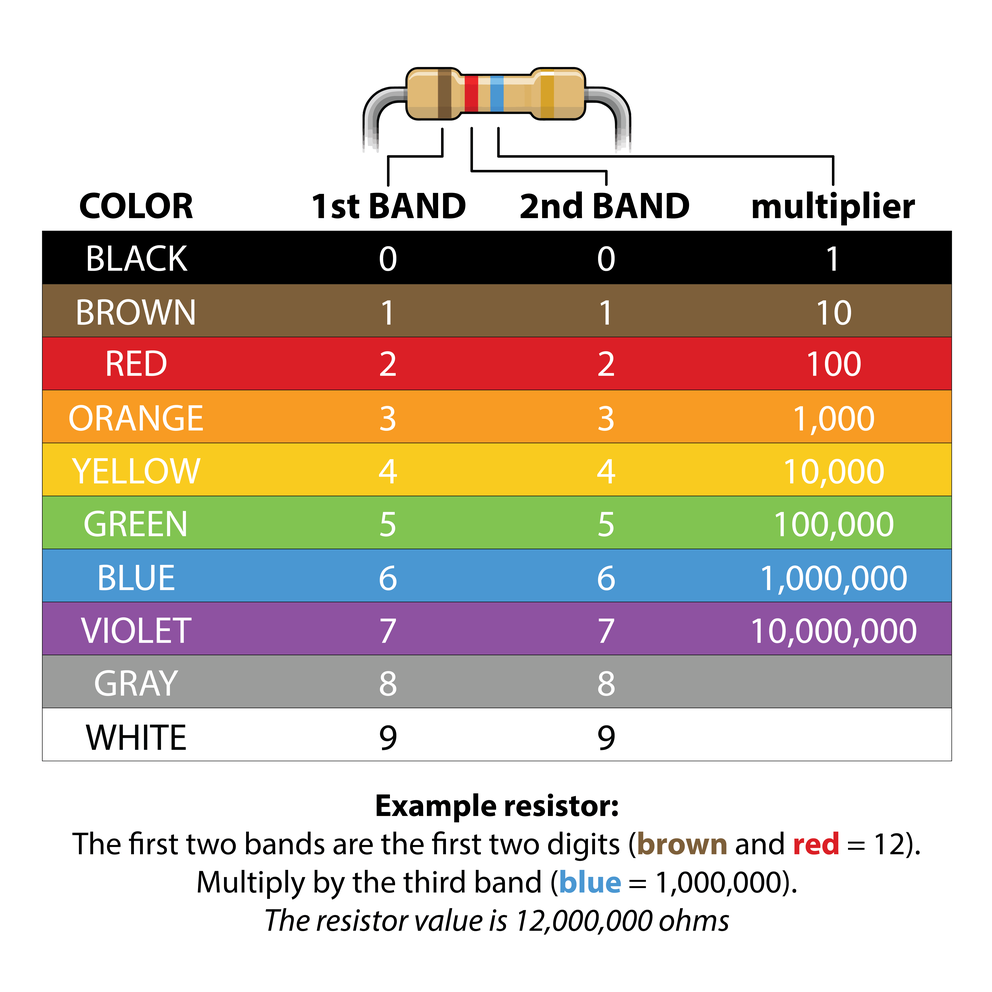
Resistors have a value measured in units of ohms. The component's value is represented by colored stripes. This chart above explains how to translate the colors to a resistance value.
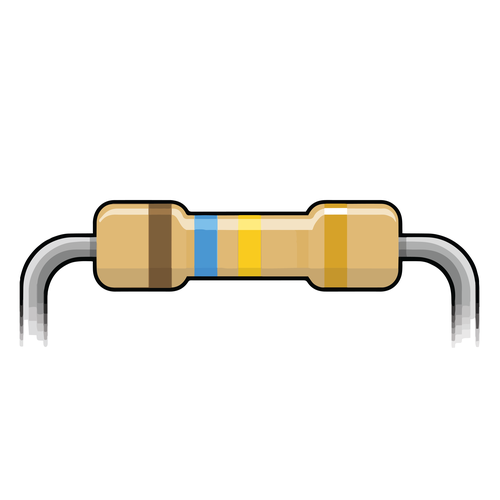
The bands on the resistor are brown, blue and yellow, what is the resistance?
460 ohms, 4,000 ohms, 16,000 ohms, or 160,000 ohms
Step Six
Resistors in Order
After trying each resistor in your circuit, can you line them up in order of resistance? Use the LED brightness to figure it out. After you line them up, use the resistor color chart to see if you got it right!
Which colored band is on the resistor with highest resistance? Brown-Black-??
orange, brown, green, red, or yellow
Step Seven

Path of Least Resistance
In a circuit, current prefers the path of least resistance. Which path do you think the current will take in the circuit shown above?
Modify the circuit by drawing a thick, heavy line across the battery terminals, as shown.
When the red light on the battery module comes on when the circuit is shorted. That means it travels along the silver ink (path 2) and not over any modules. This is happens because that Circuit Scribe line is a nice, low-resistance path. So if you see the red light on, take the battery off and try drawing your circuit without the short!
Step Eight
Custom Colors
This final activity tests your knowledge of the resistor color chart! Using colored pencils, design your own resistor on the provided page, then calculate the resistance based on the colors you chose.
